
This guide explains how to connect your organization’s Microsoft 365 room calendars with LIZ at the administrator level. This creates a centralized integration so individual users do not need to connect their calendars manually.
|
Purpose of the integration: This integration synchronizes meeting room bookings between Microsoft 365 and LIZ. It prevents double bookings and ensures both systems always show the same availability. |
VIDEOS:
Microsoft Entra: ENG_Microsoft Entra - Register the Application in Microsoft
Microsoft 365 Admin Center:ENG_Microsoft 365 admin center - Create a Mail-Enabled Security Group
Powershell: ENG_Powershell - Create the Access Policy
Requirements
You need the following access and permissions:
- Microsoft 365 Admin Center access (Global Admin recommended)
- Microsoft Entra Admin Center access (Admin rights required)
- Microsoft PowerShell access (Exchange Online module)
- LIZ Workspace Manager access (Role: Super Admin)
Information that must be provided to LIZ
After completing the setup, send the following information securely to LIZ:
- Tenant ID
- Client ID
- Client Secret Value (Important: visible only once after creation)
Overview of Steps
- Step 1: Register the Application
- Step 2: Generate a Client Secret
- Step 3: Configure API Permissions
- Step 4: Grant Admin Consent
- Step 5: Collect Connection Details
- Step 6: Restrict Access (Application Access Policy)
- 6.1. Create a Mail-Enabled Security Group
- 6.2. Connect to Exchange Online via PowerShell
- 6.3. Create the Access Policy
- 6.4. Verify the Restriction
- Step 7: Maintenance and Synchronization
- Step 8: Secret Renewal
VIDEO Microsoft Entra: |
Step 1: Register the Application in Microsoft Entra
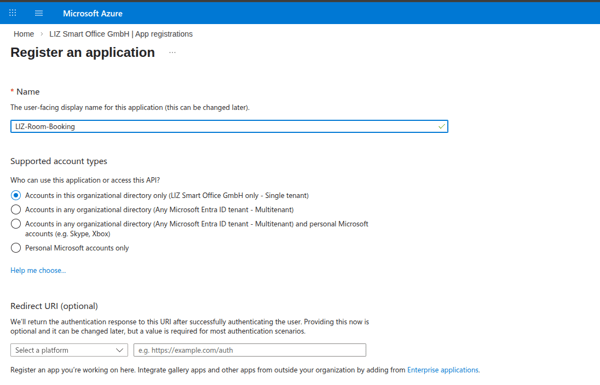
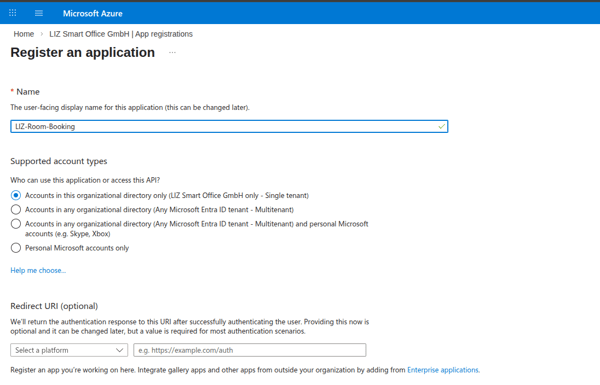
- Log in to the Microsoft Entra admin center.
- In the left-hand menu, go to Manage > App registrations.
- Click + New registration at the top.
- Name: Enter a name (e.g., LIZ-Room-Booking).
- Supported account types: Select Accounts in this organizational directory only (Single tenant).
- Redirect URI: Leave this blank. (It is not needed for the Client Credentials flow).
- Click Register.
Step 2: Create a Client Secret
Since there is no user to type a password, your application uses a "Client Secret" to identify itself.
- On the Overview page of your new app, click Certificates & secrets in the left menu.
- Go to the Client secrets tab and click + New client secret.
- Description: e.g., App Secret for LIZ.
- Expires: Choose a duration (e.g., 360 days).
- When the secret expires a new one will have to be created otherwise the connection will stop.
- Click Add.
- IMPORTANT: Copy the Value column immediately (e.g., 7xQ8...).
- Note: This value is hidden forever once you leave this page. You need it for your Python code.
Step 3: Configure API Permissions
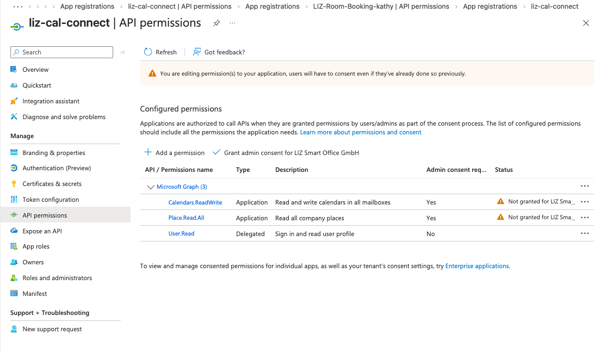
You must tell Microsoft which parts of the Graph API your app is allowed to touch.
- Click API permissions in the left menu.
- Click + Add a permission.
- Select Microsoft Graph.
- Select Application permissions (the box on the right).
- Note: Do NOT select "Delegated permissions".
- Search for and check the following permissions:
- Calendars.ReadWrite: To read and create events in room calendars.
- Place.Read.All: To list and identify conference rooms.
- Click Add permissions.
Step 4: Grant Admin Consent
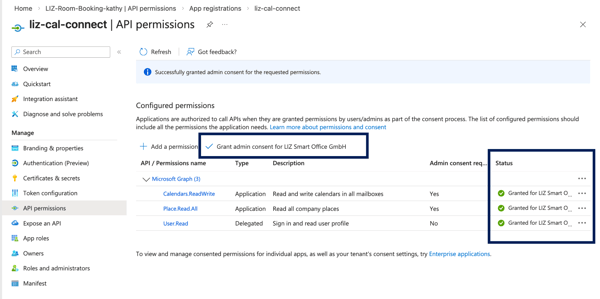
Permissions are added but not active yet. A Global Admin must authorize them.
- On the same API permissions page, look for the button Grant admin consent for [Your Organization Name].
- Click Yes to confirm.
- The "Status" column for all permissions must now show a green checkmark.
Step 5: Collect Connection Details
To connect the application to LIZ, you need three specific strings from the Overview page:
- Application (client) ID: A GUID identifying your app.
- Directory (tenant) ID: A GUID identifying your Microsoft 365 account.
- Client Secret Value: (The one you saved in Step 2).
Please send these safely to your CSM
Step 6: Restrict Access to Room Calendars Only
By default, the Calendars.ReadWrite permission granted in Step 4 allows the app to access every calendars in your organization. To restrict this to only conference rooms, you must perform the following steps using Exchange Online PowerShell.
VIDEO: Microsoft 365 Admin Center: ENG_Microsoft 365 admin center - Create a Mail-Enabled Security Group |
Step 6.1 Create a Mail-Enabled Security Group
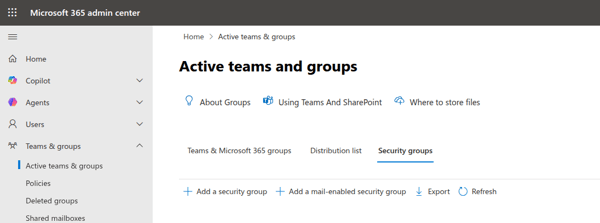
- Log in to the Microsoft 365 Admin Center.
- Go to Teams & groups > Active teams & groups.
- Click Add a group and select Mail-enabled security.
- Name: Allowed-Room-Calendars (or similar).
- Assign owners: assign if needed
- Add Members: add all needed calendar room resources
- Settings: Assign an email address to this group (e.g., room-access-group@yourdomain.com).
- Finish: Create the group.
VIDEO: Powershell: |
Step 6.2 Connect to Exchange Online via PowerShell
- Open PowerShell on your computer as an Administrator and run:
# 1. Install the Exchange Online module (if not already installed) Install-Module -Name ExchangeOnlineManagement # 2. Connect to the service (a login window will appear) Connect-ExchangeOnline |
Step 6.3. Create the Access Policy
- You will now link your App Registration (from Step 1) to the Security Group (from Step 6.1).
Replace the placeholders in blue with your actual data:
New-ApplicationAccessPolicy -AppId "YOUR-CLIENT-ID" ` -PolicyScopeGroupId "room-access-group@yourdomain.com" ` -AccessRight RestrictAccess ` -Description "Limit room booking app to specific conference rooms." |
- AppId: The "Application (client) ID" from the Entra ID Overview page.
- PolicyScopeGroupId: The email address of the security group you created.
- AccessRight RestrictAccess: This specific setting tells Exchange: "Block this app from everything EXCEPT the members of this group."
Step 6.4 Verify the Policy
- It is critical to test that the "firewall" is working. Use the Test-ApplicationAccessPolicy command to simulate the app's access.
# 1. Test a Room (Should return AccessCheckResult: Granted) Test-ApplicationAccessPolicy -Identity "room-01@yourdomain.com" -AppId "YOUR-CLIENT-ID" # 2. Test a User/CEO (Should return AccessCheckResult: Denied) Test-ApplicationAccessPolicy -Identity "ceo@yourdomain.com" -AppId "YOUR-CLIENT-ID" |
Step 7: Maintenance and Synchronization
- Propagation Delay: Be aware that after running the PowerShell commands, it can take up to 60 minutes for the policy to sync across all Microsoft data centers. If you get an "Access Denied" error immediately after setup, wait an hour and try again.
- Adding New Rooms: In the future, you do not need to touch PowerShell or Entra ID again. Simply add the new conference room to the Mail-Enabled Security Group in the Admin Center, and the app will automatically gain access to it after the sync period.
- Final Troubleshooting Checklist
- Check Group Type: Ensure the group is a Mail-enabled security group. Standard "Microsoft 365 Groups" (used for Teams) will fail with the error: "The policy scope identity is not a security principal".
- Check App ID: Ensure the AppId used in PowerShell matches the Client ID in your Python code exactly.
Where to find the Outlook Resource ID
- Open Microsoft 365 Admin Center.
- Go to Resources → Rooms & equipment.
- Select the meeting room.
- Copy the Resource email address.
- Paste it into LIZ Workspace Manager.
Client Secret Renewal
- Open Microsoft Entra Admin Center.
- Go to Manage → App registrations.
- Select your LIZ app.
- Go to Certificates & secrets → Client secrets.
- Click New client secret.
- Enter description and expiration date.
- Click Add.
- Copy the Value immediately.
- Send the new value securely to LIZ.